Securely using R and RStudio on Amazon’s EC2
October 17, 2011 at 3:32 pm 19 comments
R is a great tool for analysing data. It consists of an intuitive and interactive programming language with a vast number of extension packages (such as tnet) that allow analysts to take advantage of functions created by individuals outside the R core team. As such, it is rapidly becoming (or has it already become?) the de facto tool for data scientists. There are a number of limitations with an interactive programming language compared to compiled languages, such as higher memory (“Error: cannot allocate vector of size 762.9 Mb”) and processing requirements. There are two ways to overcome these limitations :
- Reprogramme everything in (and learn) C++
- Get more resources
While the first solution might be the most appropriate one for repetitive tasks or production code, the second one might be quicker and easier for data scientists doing one-off analyses. It is possible to get more resources without buying a new server or more memory chips by using cloud computing. In essence, cloud computing allows analysts to rent resources when they need them. Amazon is one provider with the Elastic Compute Cloud (EC2). For example, it is possible to rent a server with 8 cores and 68.4 GB of memory for $2 per hour instead of buying a $5,000+ server.
The downside to using cloud computing is security. When I first started using R on Amazon EC2, I followed the instructions Bioconductor in the cloud (Thanks guys for maintaining an updated AMI and a great tutorial!). This tutorial shows how to set up an account, creating public/private keys, changing the firewall, launching a machine image with the latest version of R pre-installed, connecting to the command line using Secure Shell or SSH, using R through the command line interface, and using R through a web browser (RStudio). While the command line interface is secure using SSH and the private key, the web interface is not secure (standard username, password, and port as well as non-encrypted traffic). This means that anyone who knows the hostname or ip address could login to an R session. In fact, a port scan of the standard port across the range of ip addresses could allow a hacker to detect vulnerable servers and get access to their computing resources and data. In the rest of this post, I will borrow from Bioconductor in the cloud but suggest points to increase the security of using their machine image on Amazon EC2.
This tutorial is basic and highlights all the steps needed to get up and running. It is written using Windows and Putty, but should be applicable to people using other software with a bit of fudging. Before you start, please download PuTTY and PuTTYgen and save them in a convenient location. Note: These programmes do not need to be installed.
Getting to the Management Console
The first thing to do is to set up an Amazon account (yes, the same one as you buy books with), and register for Amazon Web Services (AWS). Then you need to go to the AWS Management Console. The link will be on the very top of the page when you are signed in with the Amazon id. The Management Console controls a number of AWS products, so you want to go to Elastic Compute Cloud by clicking on “Amazon EC2” on the horizontal menu.
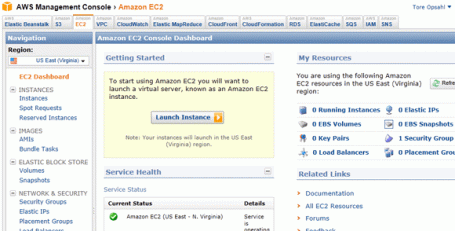
Amazon Web Service’s Management Console: The EC2 Dashboard
Public/private key pair
The first thing to do in the Management Console is to create a public/private key pair. This is important because the private key will be the “username and password” when accessing the server. This is done by clicking on “0 Key Pairs” under “My Resources” on the right, and then “Create Key Pair”. You need to give it an arbitrary name and then save the file with that-name.pem somewhere safe on your computer.
Unlike other SSH programmes, PuTTY cannot read pem-files directly. They must be converted to ppk-files. This can be done using PuTTYgen. When running the programme, click on the Load button in the middle of the screen (do not use the top menu!). Change the file-type drop-down menu from “PuTTY Private Key Files (*.ppk)” to “All Files (*.*), and select the pem-file with the private key downloaded from the Management Console. Then, click on the “Save private key” button to save the private key as a ppk-file. You do not need to password protect the file if you store it in a location only you have access to.
Firewall settings
Communication to a server occurs through ports. A firewall is a mechanism for opening some ports and closing others. A part of maintain a secure server is to only open the ones you need. The Bioconductor in the cloud-guide suggests that you open ports 22 and 8787. Port 22 is used to connect to the command line of the server using SSH. Port 8787 is the web interface of RStudio. While SSH traffic is encrypted, http traffic towards port 8787 is not. As such, this is a potential security vulnerability. I suggest that you only open port 22. Later on in this post, I will show how you can reach the web interface securely over port 22.
The firewall protecting servers on Amazon EC2 is controlled through the EC2 Dashboard’s Security Groups. A security group is a collection of instructions or rules. By default, there should be one security group called default. To see the details of this group, click on “1 Security Group” on the EC2 Dashboard and then click on “default”. The rules are listed under the “Inbound”-tab. If “22 (SSH)” is not listed, you need to open it. This is done by selecting SSH from the drop-down menu, clicking “+Add Rule”, and then clicking “Apply Rule Changes”. The servers with the default security settings will now be reachable on port 22.
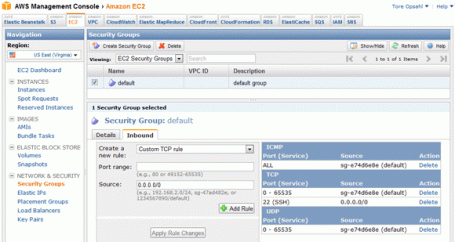
Amazon EC2 Default Firewall Settings with SSH
Running a server
Now you have completed all the one-off set-up tasks, and you are ready to launch a server or instance. By clicking on “Instances” on the left-side, you should see the instances running as well as being able to start new one. Click on “Launch Instance” to get started, and select “Launch Classic Wizard”. There are five parts to this process:
1: Choose an AMI
The first question you are asked is which kind of software system or machine image (AMI) you want. There are a number of standard ones, but to save time and many lines of code, I will show you how to make use of Bioconductor in the cloud‘s 64-bit Linux system with the latest version of R installed. To load this, select the Community AMIs-tab, enter ami-b5a079dc in the search box (R-2.15; check their website for a new AMI id when a new version of R is released), and then click the Select-button.
2: Instance Details
The next question you are asked is the resources you would like, and where you would like the server to be located (note that prices vary based on location with “US East (Virginia)” often being the cheapest). Please refer to Amazon’s current pricing table. At the time of writing, the Hi-Memory On-Demand Instances (Linux) cost the following:
| Instance | Processor Units | Memory | Price per hour |
|---|---|---|---|
| Extra Large | 2 cores / 6.5 ECUs | 17.1 GB | $0.50 |
| Double Extra Large | 4 cores/ 13 ECUs | 34.2 GB | $1.00 |
| Quadruple Extra Large | 8 cores / 26 ECUs | 68.4 GB | $2.00 |
By clicking continue, you will be offered a number of more advanced options. The default values are ok. On the third screen, you are asked to give the instance a name (e.g., R-server).
3: Create Key Pair
You should already have completed this part, so you should see the arbitrary name chosen in a drop-down box and be able to just click Continue.
4: Configure Firewall
We have also already completed this step, so make sure the default group is selected and click Continue.
5: Review
On the final page, you are able to review all the settings. Below is an example of a 68.4 memory instance.
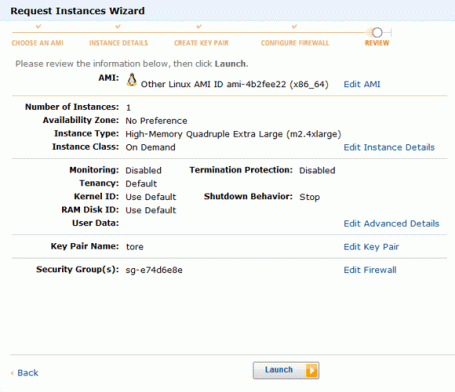
Launching an AMI
After hitting launch, a server will be allocated and the AMI will be loaded onto it. When it is complete, the status light will turn green and state “running”. Do note that you are being charged from this moment. See the final section for information on how to stop being charged.
Connecting to the command line using SSH
To control the server, you need to use SSH. The first thing we need to find out is the address of the server. This information is found by click on a running instance in the Instance-page of the EC2 Dashboard under “Public DNS”. An address will be similar to “ec2-184-72-187-196.compute-1.amazonaws.com”. Write this address down, or more easily, copy it to your clipboard. I will use this example address in the rest of the post, remember to change it to the address of your instance!
In this post, I am showing how PuTTY can be used for this; however, there are a number of other programmes out there that does the same thing. In PuTTY, we need to enter the address of the server and load the ppk-file created earlier with the private key. The screenshots below show the server’s address entered under Session and the private key loaded under SSH > Auth.
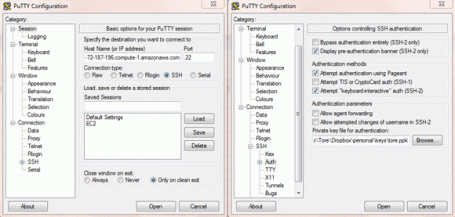
PuTTY with private key as authentication
By clicking on Open, PuTTY connects to the server. The first time you connect to a server, you will have to accept the public key. You can check the finger print against the one listed on the Key Pairs-page of the EC2 Dashboard. When asked “login as:”, simply enter root to get full privileges on the server.
Running R and installing tnet using SSH
When you have access to the command line, you can start R by simply typing R and hitting enter. This version of R comes with the Bioconductor-packages. To install the latest version of tnet, you need to type install.packages("tnet")
After downloading and compiling tnet and its dependencies, you can load tnet by typing library(tnet)
Connecting securely to RStudio Server
There are certain limitations to using the command line interface with R. First, it does not allow for graphical representations. Second, it is more cumbersome than the standard R for Windows GUI. To overcome these limitations, RStudio Server can be used. This software is a nice GUI for Linux servers running R, and is pre-installed on the Bioconductor AMI. If you opened port 8787 that the Bioconductor in the cloud-tutorial suggests, you could reach this interface by typing http://ec2-184-72-187-196.compute-1.amazonaws.com:8787 in a web browser (remember to replace the address with the one of your instance). However, as mentioned above, this leaves a large security hole open and allows others to “borrow” the resources you are paying for as well as being able to steal your data.
It is possible to communicate securely with the RStudio using an SSH tunnel. An SSH tunnel is an encrypted wrapper for other internet traffic. It is possibly best described using a diagram:
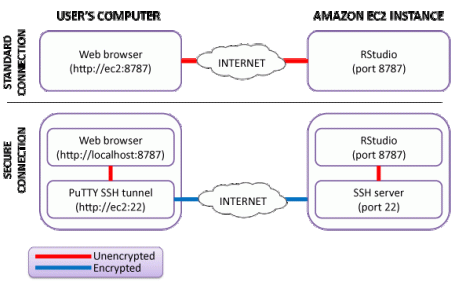
Using an SSH tunnel to encrypt the connection between a web browser and RStudio server
In a standard connection, the web browser connects directly to the RStudio Server on port 8787 (e.g., http://ec2-184-72-187-196.compute-1.amazonaws.com:8787). This traffic can be intercepted. Conversely, when using an SSH tunnel, the web browser connects to PuTTY, which encrypts the traffic and sends it to the SSH server, which decrypts it and sends it to RStudio Server. By not opening port 8787 in the Firewall, RStudio Server is only available to people logged on to the server.
To configure PuTTY to run an SSH tunnel, you need to follow the instructions for connecting to the command line. Additionally, you need to enter the following details under SSH > Tunnels:
- Source port: 8787
- Destination: localhost:8787
Do remember to click “Add”. The panel should look similar to this:
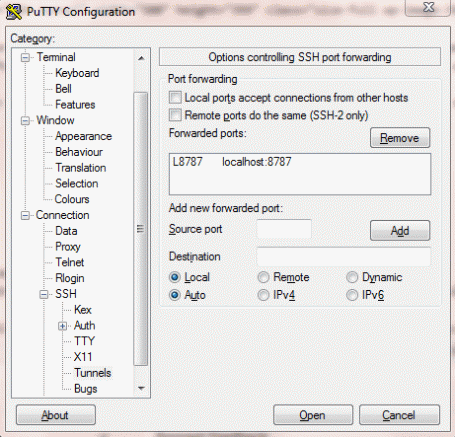
Setting up an SSH tunnel in PuTTY for RStudio Server
When you then connect to the instance (click Open and login), the SSH tunnel will be active. Congratulations: You can then open a web browser and type http://localhost:8787 to securely connect to the instance. The default username and password are unbuntu and bioc. In RStudio, you can install tnet by selecting it from the “Packages”-tab in the lower-right panel.
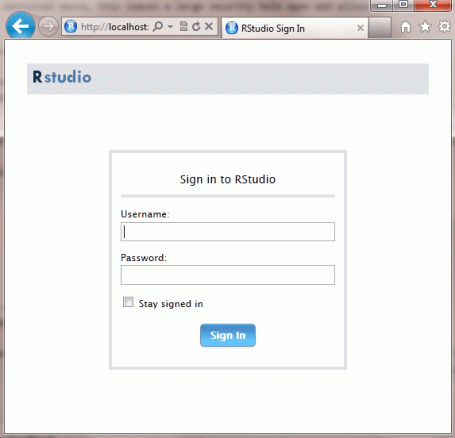
The login screen of RStudio Server. The default username and password are unbuntu and bioc.
A second less-secure alternative
By looking at the length of this post, I do realise that there are quite a few steps to achieve a secure http connection with an Amazon EC2 instance. Although the above solution ensures that it is not possible to eavesdrop on the traffic between your computer and the EC2 instance, there is a simpler trick that should stop most people trying to log into your session: change the default password. You still need to connect to the command line using SSH. When you are there, you should write passwd ubuntu to be prompted to enter a new password. Note that this procedure would require you to open port 8787 in addition to port 22 in the firewall (instead of selecting SSH from the drop-down menu, select “Custom TCP rule” and enter 8787 in the port range). Having said that, I do strongly encourage taking the extra step and using an SSH tunnel to ensure that your data and resources are safe.
Stopping and Terminating
As a final note, it is important to stop instances when you are done with them. Otherwise, you will continue to be charged! This is done by selecting an instance on the Instance-page of the EC2 Dashboard, and selecting Stop or Terminate from the Instance Actions drop-down box. Stop means that the server will be shut-down, but all the data and programmes on it will be saved on the Amazon Elastic Block Store (EBS; not free but quite cheap). A stopped instance can easily be restarted by choosing it and selecting Start from the Instance Actions drop-down box. Conversely, Terminate stops an instance without saving it to EBS. It is not possible to restart a terminated instance.
Entry filed under: Articles. Tags: EC2, R, RStudio, security, SSH, SSH tunnel.
19 Comments Add your own
Leave a comment
Trackback this post | Subscribe to the comments via RSS Feed
 RSS feed
1. Luiz | December 19, 2011 at 3:49 am
Chanced upon this while trying to better understand how EC2 could be used in some applications I have in mind, and I am really impressed by the thoroughness of your post. Well done! Can’t wait to try this myself.
2. Tore Opsahl | December 19, 2011 at 3:30 pm
Thanks, Luiz! Let me know if Amazon has changed anything with their interface.
3. john | January 11, 2012 at 10:28 pm
This is a fantastic resource, thanks greatly.
I am having some trouble though. Evertything is fine until I try to do the tunneling to RStudio.
I suspect there is a deeper problem since I even tried opening port 8787 like the Bioconductor doc says and still could not get my browser to open RStudio.
Is it possible that some instances have RStudio listening on another port, e.g. port 80?
I was trying to figure out whether the issue was on my PC (Windows XP but running ZoneAlarm
for a firewall and other security measures) or on the server side.
On the EC2 instance I ran netstat and the message seemed to suggest that RStudio
was listening on port 80. Still unable to connect on port 80 though with my web browser.
Anyone else having these issues?
thanks again,
– john
4. john | January 12, 2012 at 3:10 am
I resolved my problem and was able to open RStudio on the EC2 instance … even using the tunneling.
I had searched for an instance using the “RStudio” keyword rather than bioconductor.
Once I got the BioConductor instance it all started working.
Thanks again.
– john
5. Tore Opsahl | January 12, 2012 at 3:33 am
Hi John,
Great that you managed to solve it! It is easier to search for the ami id. If you go to the bioconductor page, they list their latest version (currently ami-9f12dcf6; R-2.14).
Best,
Tore
6. Peter Verbeet | January 24, 2012 at 1:09 pm
Hi Tore,
When running R code over multiple threads on EC2, do you need to use snow, foreach, or another parallellization package? Or can I just run my normal code and see the speed go up as the number of cores increases in the cloud? In other words, do I need to learn additional programming tools in order to run R in the cloud?
thanks,
Peter
7. Tore Opsahl | January 24, 2012 at 4:14 pm
Hi Peter,
As far as I’m aware, an R instance on EC2 is just like an R instance on your computer. In other words, running a single instance of R without any form of parallell processing package uses a single core (at least for now).
Although there are parallell processing packages, I have found that for one-off analysis is that the potential gain is limited (e.g., the cost of extra programming time is often greater than the cost of extra running time). If you are to set up a repeating computationally intensive task, you might want to consider reprogramming it in c++ or using a map-reduce job (i.e., Hadoop / Amazon Elastic MapReduce).
Let me know what you end up doing!
Good luck!
Tore
8. Arnaud Amzallag | February 23, 2012 at 8:59 pm
Hi Peter,
The AMI described in this post comes with the packages multicore and Rmpi for parallel computing. The tutorial of the AMI (http://bioconductor.org/help/bioconductor-cloud-ami/) gives examples on how to use it.
Arnaud
9. Brian Keegan | March 1, 2012 at 4:48 am
Some miscellaneous notes. Installing a package like statnet, many distros always seem to be missing some libraries to do install.library(x), especially where x is statnet.
add: deb http:///bin/linux/ubuntu *version* to /etc/apt/sources.list
run: sudo apt-get update
run: sudo apt-get install r-base
run: sudo apt-get install r-base-dev
run: sudo apt-get install r-cran-rgl
Seems to fix it.
10. Tore Opsahl | March 1, 2012 at 6:54 am
Thanks Brian!
11. Steffen | January 26, 2013 at 3:04 pm
In 2011, I had similar problems installing the complete statnet suite (package:statnet) on an Ubuntu machine. The package “rgl” was needed as dependency and couldn’t be installed.
What helped in my case was manually installing the following linux packages including their dependencies:
libx11-dev
libglu1-mesa-dev
12. Louis | April 25, 2012 at 4:19 pm
Hi thank you for your post. I managed to set up a tunnel ssh connection to the 2.14 bioconductor machine.
But now I am trying to access a csv file stored in S3 and I don t seem to be able ro access it.
Could you tell me which method I can use to acces either my S3 bucket or a file saved on my C drive .
Thank you very much
13. Tore Opsahl | April 26, 2012 at 1:51 pm
Hi Louis,
You can sftp your instance and post the file, or you can do an http request towards s3. Just google, and there’s plenty of info on this topic.
Best,
Tore
14. Ajay Ohri | October 19, 2012 at 1:15 pm
what if I just modify the security group in the R Studio server instance to run from my own IP address- what are your views on that- from a security and user convenience perspective.
Ajay
15. Tore Opsahl | October 19, 2012 at 1:56 pm
Ajay,
Restricting the IP range to your specific IP is another of limiting access. From a convenience perspective, if you do not have a static IP, you would have to change the security group in the AWS console. I find the tunnel setup much easier as it’s simply a setting in most SSH clients.
Best,
Tore
16. Steffen | January 26, 2013 at 3:10 pm
Tore, thanks for this very helpful and well-explained tutorial. Are their further instructions availabel on how to efficiently run Siena-models within a “cloud” of multiple AWS-instances? Asked differently, would that speed up estimation and simulation (siena07 ( ) and the gof-tests )?
Best Steffen
17. Tore Opsahl | January 26, 2013 at 4:28 pm
Steffen,
I haven’t needed to run SIENA as I don’t deal with panel-observed networks; however, running in the cloud is like running on your own machine, except for the fact that you can get a lot of memory and cores. If you set up SIENA to use multiple cores (see section 2.6 in the manual; http://www.stats.ox.ac.uk/~snijders/siena/s_man400.pdf), you should see some real performance benefits.
Hope this helps,
Tore
18. Aleksandr Blekh (@ABlekh) | April 30, 2014 at 7:46 am
Hi, Tore! Just ran across your nice tutorial, while investigating problem(s) with R/RStudio setup on my new EC2 instance. I was wondering, if you could take a look and advise: http://stackoverflow.com/questions/23357551/unexpected-behavior-of-r-after-install-on-another-ec2-instance. Thank you!
19. Tore Opsahl | May 7, 2014 at 11:24 pm
Hi Aleksandr,
I hope you managed to get the instance up and running. I would advise you to do use an image with R preloaded. Much simpler.
Good luck,
Tore